My Secret Editing Trick
Here’s an editing trick you will use nearly every time you edit your podcast. I’ve relied on it to save great guest responses I might otherwise have had to scrap. It takes a bit of practice and some trial and error, but with a little persistence you’ll pull off this edit like a pro.
The Situation
Your interview guest rambles on in response to your question. After a few minutes of sleep-inducing dribble, your guest says, “Then I…” and proceeds to deliver 18 seconds of the best sound bite you’ve ever heard. You want that sound bite. You lust for it. There’s only one problem.
You need the bite to start with “I..” and not with “Then, I…”
The word “then” means your guest is referencing something he or she said earlier, and you don’t want to include any of the dribble before the sound bite. You’ve tried adding a bit of your own narration to put the bite in context, but it didn’t work. What you want is so simple you don’t understand why you can’t have it: you want the bite to start with “I…”
Oh Blippity Blip
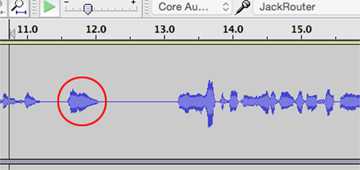
When you look at the sound bite in your editing software, this is what you see.
See that blip? That blip is “Then, I,” run together as if they were a single word. For the purposes of editing, they might as well be. When you try to split the then from the I you run into endless frustration, as if you were trying to drive your way out of a dead end street. Either your result starts with some residual sounds from the then, as in “nye…” or you get rid of any then sound at the expense of the start of the I sound. Your bite begins with what sounds like your guest finishing a cough. (Audio engineers say the opening is clipped. That’s a different use of the word then when we’re talking about sound that’s so loud it’s distorted. This use means the sound begins in the middle of a word.)
Clipped is Your Friend
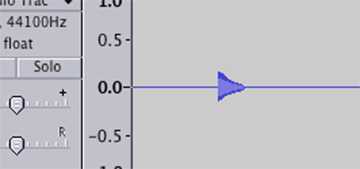
Of the two, beginning with the remnants of then or beginning with the clipped I, the latter is way better than the former, because you can fix the clipping. Here’s what the waveform looks like when I cut away all the then sound.
See the left side of the blip? It’s nearly a vertical line. That’s what a clipped word looks like. That transition from no sound (the horizontal line) to full sound (the vertical line) is the problem. If only there were a way to make the left side of the blip rise more slowly. That would fix everything.
This Fixes Everything
Fade in. It’s a feature on every digital editing software I’ve ever seen. And it’s what’s going to save your sound bite.
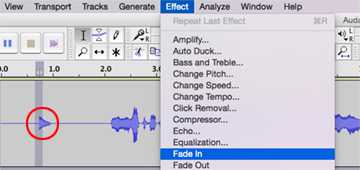
In Audacity (pictured here) you highlight the part of the waveform you want to adjust and then apply the Fade In effect.
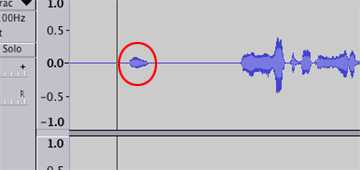
The result is a slow rise on the left side of the blip. (You may have to apply Fade In more than once. In this picture, I applied it twice to get a smoother rise.)
Back up about five seconds and roll through your edit. If you’ve got it right you won’t even know you made a cut. If not, play around with where you start and end the Fade In effect. The more area you highlight the slower the Fade In effect will be. The less area, the faster the fade in, and the more chance the clip will still be there.
When you hit that sweet spot, your handiwork will be invisible. There’s a good chance your guests won’t even know they’ve been edited. They’ll simply marvel at how eloquent they were that day. (Remember, the number one reason for editing an interview is to make your guest sound good.)
You can also use this trick in reverse. You may have to cut the end of a guest’s response short. This time, the right-hand side of the blip has the vertical line, and to soften it you use…Fade Out. It’s the same principle only applied to the other side of the blip. As my college calculus textbook used to say, “The proof is left to the student.”
If you have a production question, leave a comment or contact me directly through the website. If I can’t answer it I’m sure one of my readers can.


